In the three stages of video production, pre-production is the process of planning all aspects of the video production process before filming begins. Planning is a key element of creating a video project, especially before you begin recording any actual video. This process includes scriptwriting, storyboarding, scheduling, logistics, and other administrative duties. Pre-production ends when the planning ends and the content starts being produced.
When first planning your video, consider these questions:
This page will help you:
Creating a script for your video is a critical step that is often overlooked by novice videographers. A script should include all the actions, dialogue, locations, and effects that you hope to include in your video, in chronological order. A well-written script allows you to plan out your video's message, estimate the length of your video, and iron out any content issues before you begin shooting. Review the following steps to help you create a script for your video project:
Before you start to write your script it's important to create a brief summary of your project and what you're hoping to accomplish. Not only does this help you understand your objectives, it also helps you understand your audience and how best to reach them.
You short video summary should consider the following questions:
When creating your video you'll most likely have several ideas that you wish to communicate (your summary will help you identify these); the tricky part is translating these often disorganized ideas into a simple story for your script that resonates with your audience. The key element here is to ensure your script has a logical progression from one idea to another. Start by organizing your key points into an order that makes sense to you, then start to expand upon those points with detail until you have a basic outline of your script. Don't worry about getting the order right the first time, as you add more detail you should feel free to reorganize your ideas to add clarity.
As you add detail to your outline, look for patterns in your topic that you can turn into a narrative. This is also a good time to think more about the format and style of your video: Does the topic lend itself to humor or comical skits? Does the topic require a lot of complex descriptions that requires graphics? Could you introduce different concepts using an interview format? Or can you incorporate your own unique format? Next, continue to develop your narrative by adding scenes, actions, and dialogue. Always remember that a good script should grab your audience's attention and convey your topic in an engaging and understandable way.
When writing your script, always talk in your audience's language rather than your own. Remember that your are meant to explain your topic in a way that demonstrates you fully understand it (for your professor) but also communicates the topic to people who did not do the same research you did (your classmates). This means speaking on a level that your entire audience will understand, with concepts and vocabulary they're already familiar with. If you do have to intrude a new concept or term, be sure to explain them in a full and clear manner. Don't simplify things too much, however, the idea is to fully demonstrate what you have learned!
When it comes to script writing, less is often more. In a great script every word earns its place and each sentence should be structured to get the point across. Say everything you need to say but keep it as succinct as possible; I guarantee your audience isn't interested in listening to minutes of complex technical details, long run-on sentences, or a list of steps your group followed.
Here are some suggestions for keeping your script as impactful as possible:
You don’t want your video to sound like you are reading off a list of bullet points so make sure you read your script aloud a number of times to ensure this doesn’t happen. You may feel a bit embarrassed reading your script aloud, but it’s the best way to ensure your timings are correct and that it makes sense and runs smoothly. This process will also allow you to identify any areas for improvement.
You're making a video, not writing a novel. You've got more than just words to play with in your script so don't feel like you need to communicate everything through dialogue. Consider telling your story and explaining your topic through editing, motion graphics, music, sound effects and voice overs. Instead of speaking for 10 minutes straight, incorporate eye-catching graphics, images, and video clips to explain your topic in a much more interesting and exciting way.
Never consider your script complete until you've run through it as a group at least twice. Get your group members together and read through the script as if you were recording it. This will give you an opportunity to gauge the flow and clarity and spot any room for improvement.
 Storyboarding is a method for sketching out your video shot-for-shot to help organize your thoughts and prepare you for planning your project. A storyboard (sometimes called a shot list) is a list of everything you want to record, arranged in the order you will record it. Traditional storyboards are usually broken up into squares where each square represents a single shot of your video. It shows who or what is in the scene, what’s being said, and any text or graphics that appear on the screen. As you read through a storyboard, you should be able to “see” the video playing in your head. Storyboards don't have to be complex and can either be hand-drawn (like a comic) or created using computer software (like PowerPoint).
Creating a storyboard forces you to plan out your video, consider locations and backgrounds, connect your script to the scene, and plan for effects and graphics. Having a detailed storyboard will help you make important decisions early in the process, help you stay organized and make sure you record everything you need at each location, and save time during production.
Step 1: Start with a Template
Draw a number of rectangles on a sheet of paper, just like a comic strip. It might be helpful add space or lines for script notes below each rectangle. You can also use PowerPoint or download a pre-created storyboard template online.

Storyboard Template by 70Jack90/Wikimedia Commons
Step 2: Add Script Notes
Write corresponding notes and lines of dialogue under each scene.
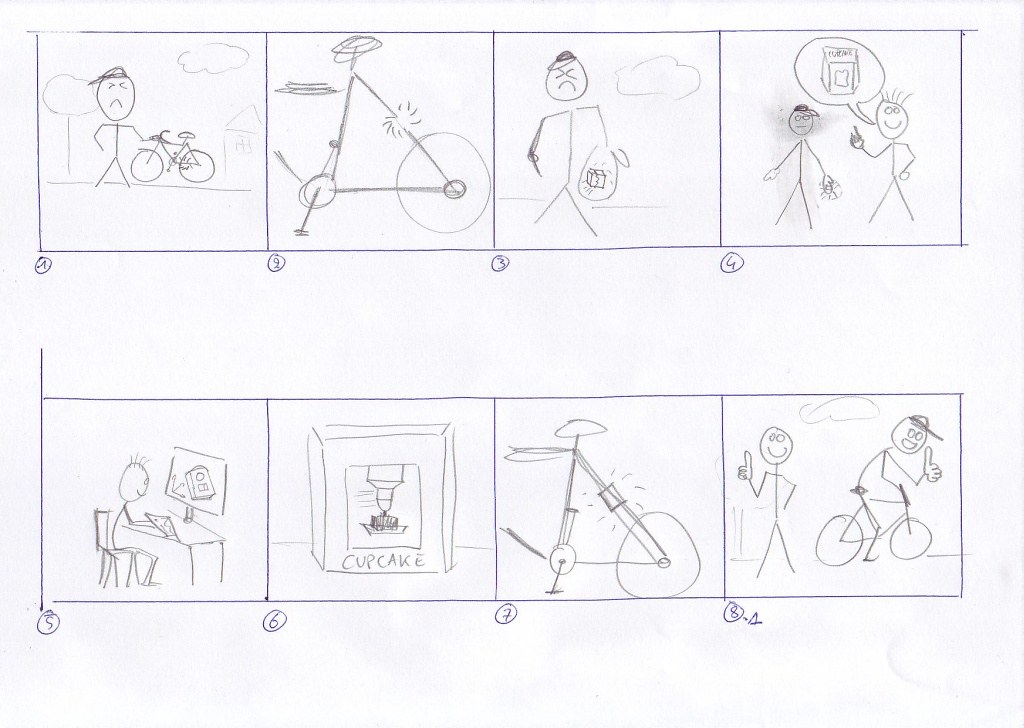
Draw out each scene (stick figures work great!) including any actors, props, background elements, etc. It's also helpful to indicate any movement in the scene using arrows.

Storyboard by various brennemans/flickr
Step 4: Add Scene Notes
This might include a description of what’s happening, camera angles or movement, graphics, music and sound effects, etc.
Consider physically cutting your storyboard into scenes so that you can reorder and recombine them until you are happy.
Once you have your script and storyboard completed, you will need to create a schedule for your project that dictates when each element will be recorded and who is doing what role, or, when you plan to have your script done, media downloaded, project edited, etc. Your schedule needs to consider: